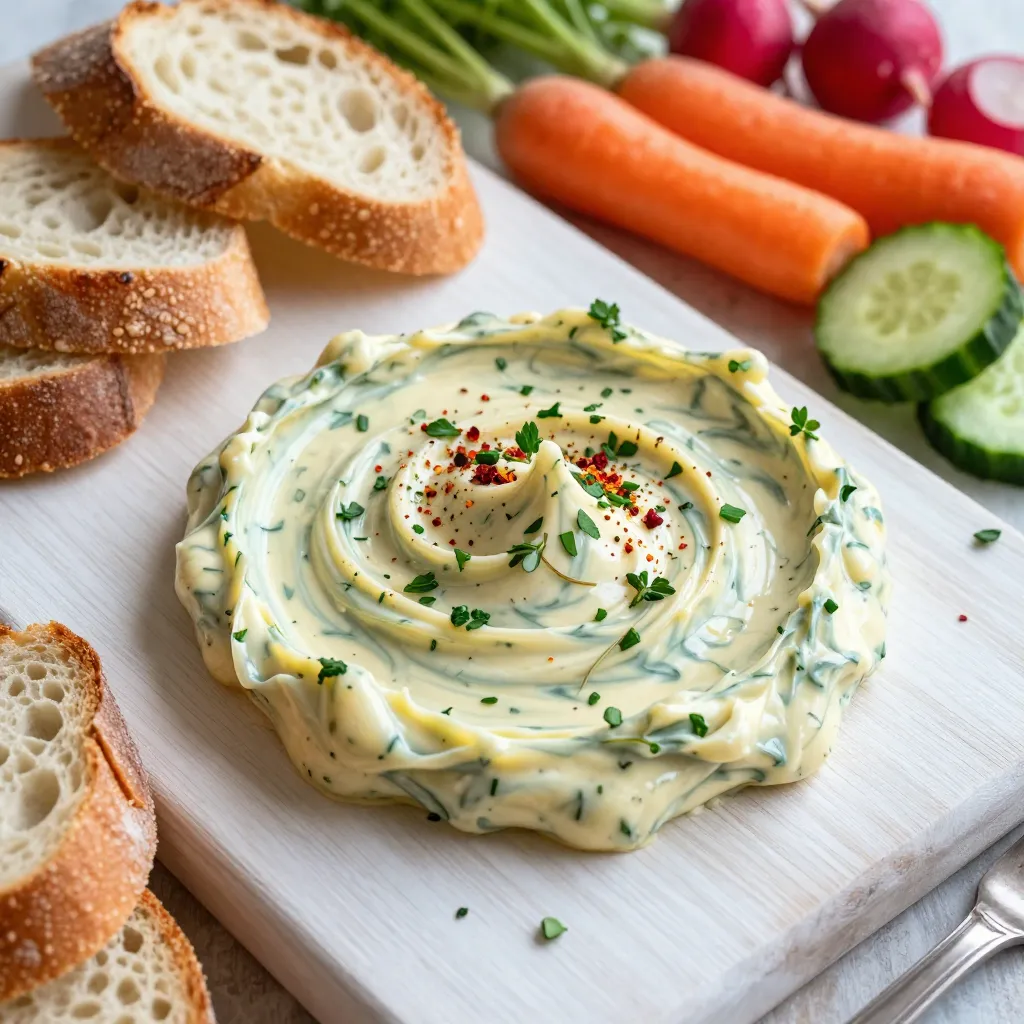
Ready to elevate your next gathering with an easy and flavorful dish? The Garlic Herb Butter Board is your secret weapon! This delightful spread combines fresh herbs, garlic, and creamy butter. It’s perfect for any bread or fresh veggies you have on hand. In this post, I’ll guide you step-by-step to create this stunning and tasty treat. Let’s dive into the simple joy of making a Garlic Herb Butter Board!
Why I Love This Recipe
- Easy Preparation: This garlic herb butter comes together in just 10 minutes, making it a quick and satisfying addition to any meal or gathering.
- Flavor Explosion: The combination of fresh herbs and garlic creates a rich and aromatic flavor that elevates even the simplest of breads.
- Versatile Serving: Whether paired with crusty bread or fresh vegetables, this butter board adapts to any palate and occasion.
- Visually Stunning: The artistic presentation on a board not only looks beautiful but invites guests to dig in and enjoy together.
Ingredients
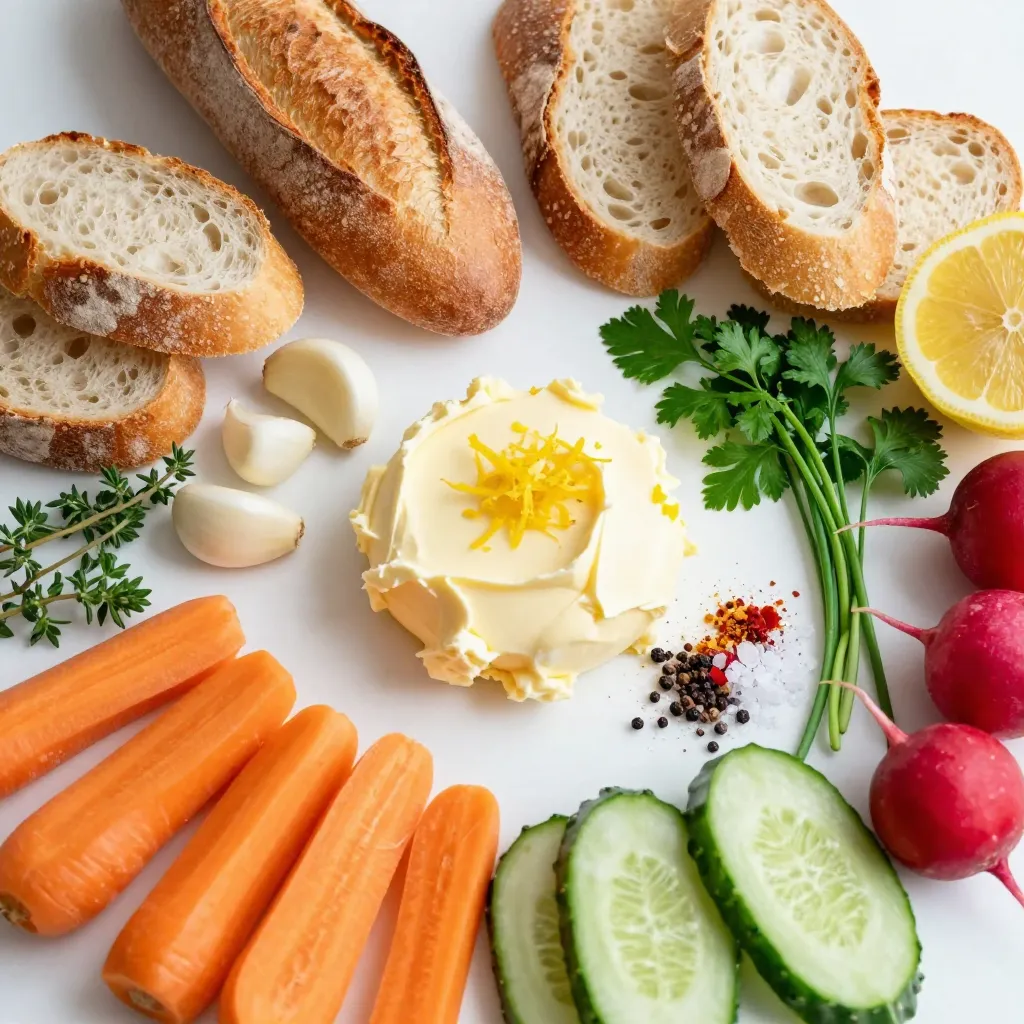
Gathering the right ingredients is key to a tasty garlic herb butter board. Here’s what you need:
– 1 cup unsalted butter, softened
– 4 cloves garlic, finely minced
– Fresh herbs: parsley, chives, thyme
– 1 teaspoon fresh lemon zest
– 1/2 teaspoon crushed red pepper flakes (optional)
– Salt and freshly ground black pepper, to taste
– An assortment of breads for serving (like baguette, ciabatta, or sourdough)
– Fresh vegetables for dipping (carrots, cucumbers, radishes)
Start by softening your butter. This helps it mix well with garlic and herbs. Mince the garlic finely. This step brings out its strong flavor. Chop the herbs and zest the lemon. Each ingredient adds great taste and color.
The crushed red pepper flakes are optional. They give a little kick, but you can skip them if you prefer mild flavors. Season the butter with salt and pepper for balance.
Finally, choose a mix of breads and fresh veggies. This will make your board fun and exciting. Enjoy the process of creating your garlic herb butter board!
Step-by-Step Instructions
Preparation of Garlic Herb Butter
To start, take a medium-sized mixing bowl. Add 1 cup of softened unsalted butter. Next, include 4 finely minced cloves of garlic. Then, add 2 tablespoons of chopped fresh parsley, 1 tablespoon of finely chopped chives, and 1 tablespoon of stripped fresh thyme leaves. Finally, mix in 1 teaspoon of fresh lemon zest.
Now, if you like some heat, fold in 1/2 teaspoon of crushed red pepper flakes. This step is optional. After that, sprinkle in some salt and freshly ground black pepper to taste. Use a spatula to blend everything well. You want a smooth and cohesive butter mixture.
Presentation Techniques
Once your garlic herb butter is ready, it’s time to serve. Carefully transfer the mixture onto a wooden serving board. Use your spatula to create a lovely swirl or a decorative pattern on the surface. This makes it look inviting and delicious.
For an extra touch, you can garnish the butter with more finely chopped herbs or a light sprinkle of crushed red pepper flakes. This adds color and flair to your dish.
Arranging Accompaniments
Now, let’s talk about what to serve with your garlic herb butter. Select a variety of breads, like baguette slices, ciabatta, or sourdough. Arrange these breads around the edges of your board.
Then, choose some fresh vegetables for dipping. Carrots, cucumbers, and radishes work well. Place these colorful veggies next to the bread. This not only looks nice but invites your guests to dip and enjoy the garlic herb butter.
Tips & Tricks
Perfecting Garlic Herb Butter
The key to great garlic herb butter is butter temperature. Always use softened butter. Cold butter does not mix well with the herbs and garlic. Let it sit at room temperature for about 30 minutes. This helps blend the flavors better.
To store leftover garlic herb butter, place it in an airtight container. You can also wrap it in plastic wrap. Keep it in the fridge for up to two weeks. For longer storage, freeze it. You can form it into a log and wrap it tightly. Cut off slices as needed later.
Serving Suggestions
Garlic herb butter pairs well with meats like grilled chicken or steak. It adds rich flavor to fish too. Spread it on meats just before serving for extra taste.
You can use garlic herb butter in many creative ways. Try it on popcorn for a tasty snack. Mix it into pasta for added flavor. Use it to sauté vegetables for a delicious side dish. The options are endless!
Pro Tips
- Use Room Temperature Butter: Ensuring your butter is at room temperature makes it easier to blend with the herbs and garlic, resulting in a smoother and more cohesive mixture.
- Fresh Herbs are Key: For the best flavor, use fresh herbs instead of dried ones. They provide a vibrant taste and enhance the overall experience of the garlic herb butter.
- Customize Your Heat Level: Adjust the amount of crushed red pepper flakes based on your preference. Start with a small amount and increase until you reach your desired spice level.
- Presentation Matters: Take the time to create an appealing presentation. Use a variety of colorful vegetables and bread types to make the butter board visually enticing for your guests.
Variations
Flavor Enhancements
You can change the flavor of your garlic herb butter easily. Try adding different herbs or spices to make it your own. For example:
– Basil gives a sweet, green taste.
– Oregano adds a hint of warmth.
– Rosemary brings a strong, earthy flavor.
You can also make infused butters. To do this, melt your butter and add in flavors. For instance, mix in roasted garlic, sun-dried tomatoes, or even citrus zest. Let it cool and solidify. This gives each bite a new twist.
Dietary Options
If you want a vegan alternative, use plant-based butter. This keeps the taste rich and creamy without dairy. You might also try nut butters, like cashew or almond, for a unique flavor.
For those needing gluten-free options, serve with gluten-free breads. Rice crackers or veggie sticks are great, too. They add crunch and fresh taste. Enjoying garlic herb butter can be simple and tasty, no matter your diet!
Storage Info
Best Practices for Storage
To keep your garlic herb butter fresh, store it in an airtight container. This will help prevent it from absorbing any other flavors in your fridge. If you want to store it longer, you can freeze it. Just wrap it in plastic wrap and place it in a freezer bag. Make sure to squeeze out any air before sealing.
Shelf life:
– In the fridge, your garlic herb butter will last about one week.
– In the freezer, it can last up to three months.
Serving from Storage
When you take the butter out of the fridge, it will be cold and hard. To use it, let it sit at room temperature for about 15-20 minutes. This will make it easier to spread on your bread or veggies.
If your butter has been in the freezer, let it thaw in the fridge overnight for best results. You can also grate it while frozen if you need small amounts for cooking.
To restore consistency after refrigeration, just stir it gently with a spatula. This will help bring it back to that creamy texture you love.
FAQs
What can I serve with garlic herb butter?
You can serve garlic herb butter with many tasty foods. Here are some great options:
– Sliced baguette or ciabatta
– Toasted sourdough bread
– Fresh vegetables like carrots and cucumbers
– Crackers for a crunchy bite
– Grilled meats for added flavor
– Roasted potatoes for a rich twist
Each of these options will soak up the buttery goodness. You can mix and match to find your favorites.
Can I make garlic herb butter in advance?
Yes, you can make garlic herb butter ahead of time! Mix up your butter and transfer it to a container. Seal it well and store it in the fridge. If you want to make it even earlier, you can freeze it. Just wrap it in plastic wrap and place it in a freezer bag. When you want to use it, let it thaw in the fridge overnight.
How long does homemade garlic herb butter last?
Homemade garlic herb butter lasts about one week in the fridge. Make sure to keep it sealed to keep it fresh. If you freeze it, it can last up to three months. Check for any signs of spoilage before using. Always trust your nose; if it smells off, it’s best to toss it.
This blog post covered how to make garlic herb butter from simple ingredients. You learned the steps to prepare, present, and store it. We also shared tips for perfecting the butter and creative serving ideas.
Garlic herb butter enhances many dishes and tastes great on bread and veggies. It’s easy to customize for different diets too. Explore your creativity with flavors. Enjoy making this delicious sprea